The half marathon has passed. The training this year went well, with no running related injuries to speak of at the point of writing, although I did get food poisoning a week before the race and I missed my last long run. I have learned a lot over the course of the year, which has helped get me to this point. The actual race was a totally different experience, it rained for the first few kilometres, I had stomach cramps and I suffered intense muscles spasms, none of which happened in over a thousand kilometres of my training over the course of the last two (2) years.
Race Day
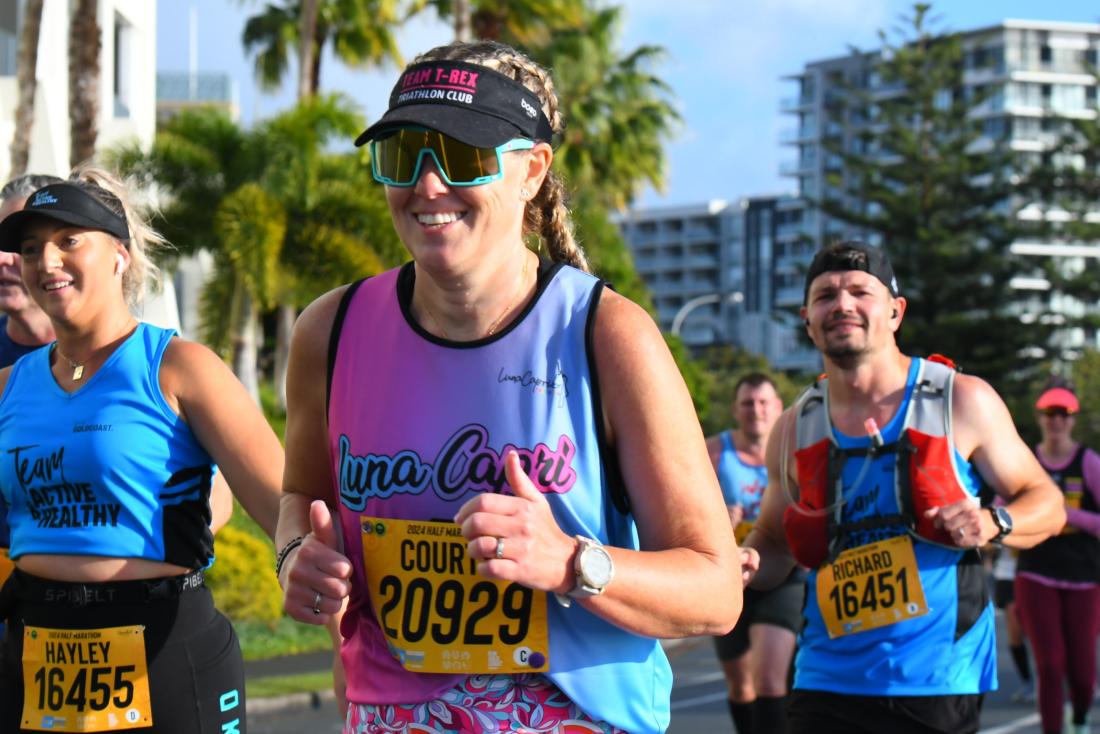
Race day 2024 was very different than I expected. I felt confident due to all my training. The rain was an annoyance, but one easily overcome by a running jacket (if I race again I’ll get a opaque poncho).
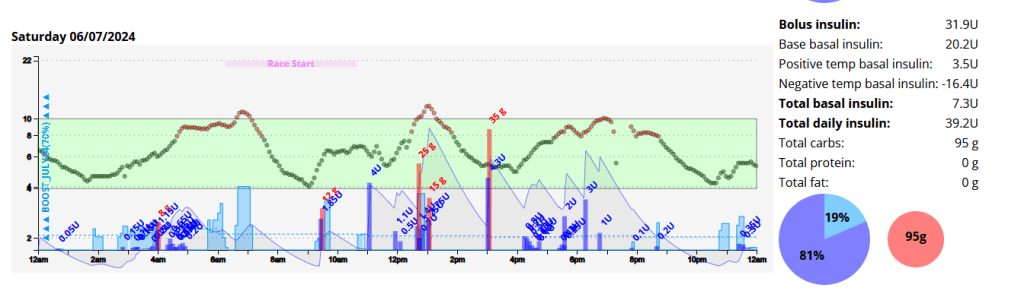
I woke up at 03:50am with little sleep and a blood glucose of 5.8 mmol/l. This crept up steadily, likely due to cortisol and adrenaline. By race start time I was 9.0 mmol/l with 0.9 units of insulin on board (IOB). Due to the IOB I ate about one third of a Cliff Bar (18g of carbohydrates) which in hind-sight was a mistake.
Nightscout graph for the entire day.
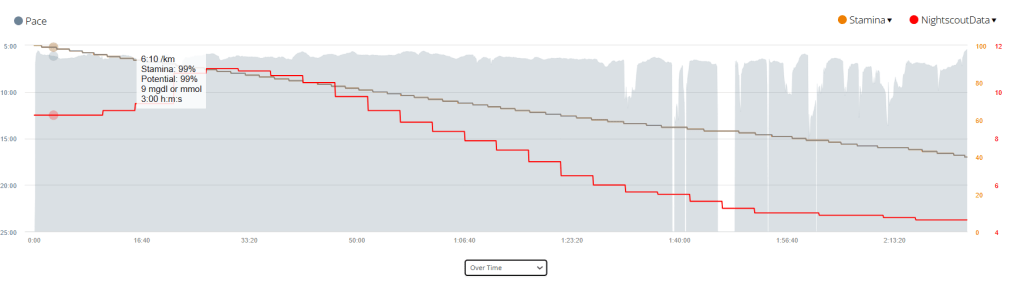
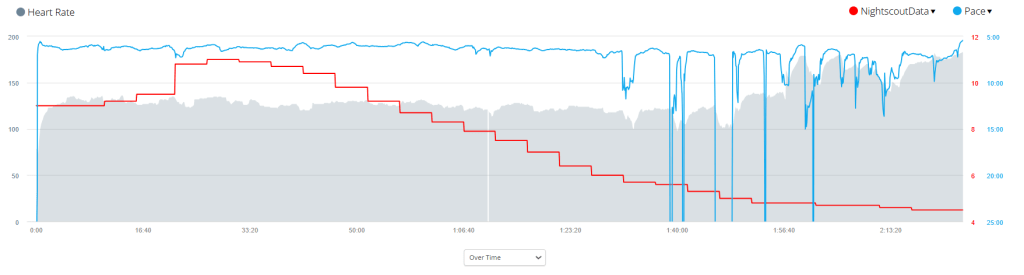
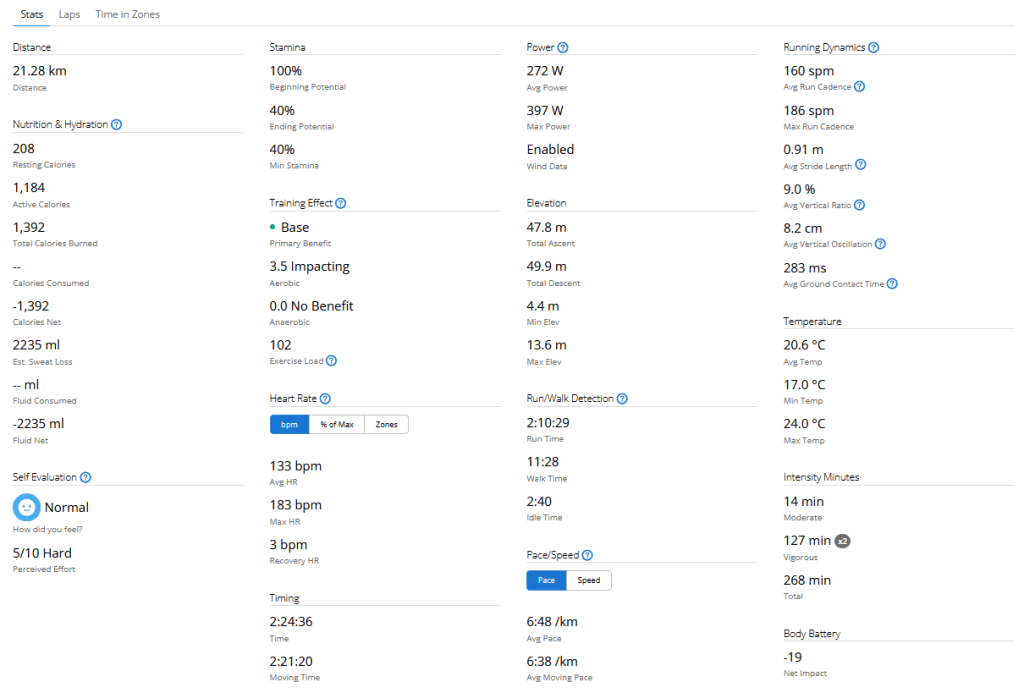
Due to the inclement weather my Garmin didn’t pick up my heart rate on my watch consistency, or perhaps even accurately. I found my Garmin advising I was running at approximately 130 BPM even though I felt I was pushing quite hard. I got a personal best (61 minutes) for the first 10 kilometres.
AAPS graph for race day.
Label
Race Day
Average during Training
Start Time
06:23 am
Distance
21.2km
Average HR
133 BPM
Standard Deviation
2.3 mmol/l
0.8
Coefficient of the variation
31.9%
11.3%
Blood Glucose – start
9 mmol/l
6.5
Blood Glucose – min
4.4 mmol/l
Blood Glucose – max
11.1 mmol
Blood Glucose – average
7.4 mmol/l
6.7
Time in Range (3.9-7.8)
51%
71.9%
Insulin on board
0.99
0.1
Race day compared to training was wildly different, I will need to analyse the data and come up with a better race day strategy.
Time vs. Pace with a Stamina and Blood sugar overlay. Time vs. Heart Rate with a Pace and Blood sugar overlay. All Garmin Race Stats
Training
I’ll add the link once all data is processed.
Equipment
I try to come prepared for all possibilities.
This year I spend a lot of time finding the perfect shoe for my unique requirements, namely that I supinate on my right foot due to an atrophied right calf muscle. In my testing, the Brooks Ghost performed the best, allowing me to run any distance with no pain or discomfort.
Final Thoughts
The food poisoning caused an electrolyte balance, which resulted in muscle cramps on race day. This was something I had not experienced during my training, an I was ill prepared for it.
My sugars were higher than during training again, and if I do this again I will refrain from coffee or any carbs prior to the event.
Continuous glucose monitoring (CGM) is a technology that allows people with diabetes to track their blood sugar levels in real time. A CGM sensor is inserted under the skin and measures glucose levels in the interstitial fluid, which is the fluid that surrounds the cells. The sensor sends readings to a receiver or smartphone every few minutes, so you can see how your blood sugar levels are changing throughout the day.
What is traditional blood glucose testing?
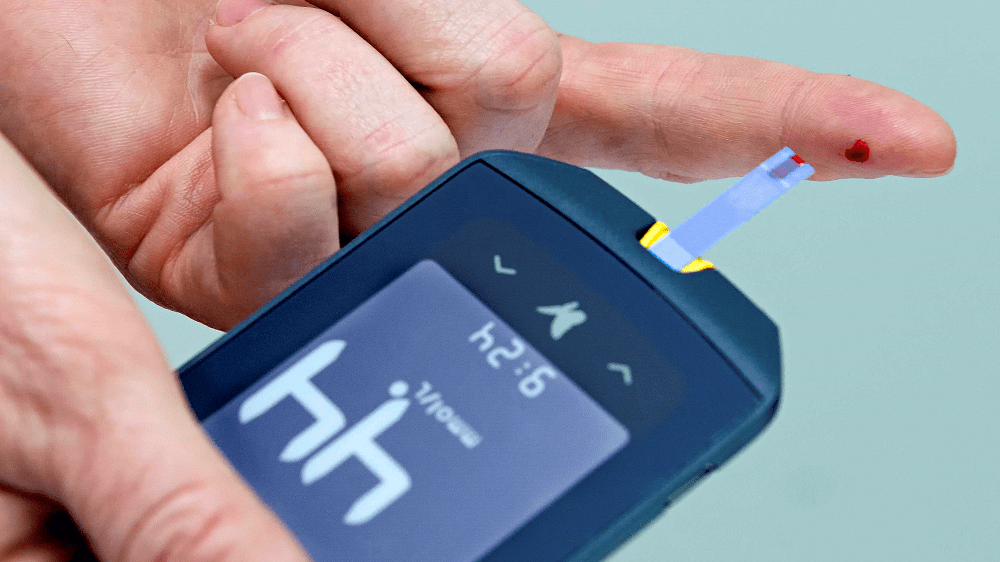
Traditional blood glucose testing involves pricking your finger to draw a drop of blood, which is then applied to a test strip. The test strip is inserted into a blood glucose meter, which provides a reading of your blood sugar level. Traditional blood glucose testing is typically done several times a day, but it can be more frequent if you have diabetes that is not well controlled.
Advantages of CGM
CGM has several advantages over traditional blood glucose testing, including:
Real-time monitoring: CGM allows you to see your blood sugar levels changing throughout the day, which can help you make better decisions about insulin dosing and food choices.
More data: CGM provides more data about your blood sugar levels than traditional blood glucose testing. This data can be used to identify trends and patterns in your blood sugar levels, which can help you improve your diabetes management and has allowed for advances like Artificial pancreas systems (APS) to be created.
Less finger pricks: CGM can help you reduce the number of finger pricks you need to do each day. This can be helpful for people who have diabetes and are sensitive to pain.
Disadvantages of CGM
CGM also has some disadvantages, including:
Cost: CGM devices can be expensive, and the sensors need to be replaced every 7-10 days.
Accuracy: CGM sensors are not always accurate, and they can be affected by factors such as exercise, illness, and food.
Inconvenience: CGM sensors can be uncomfortable to wear, and they can be damaged if they are not properly cared for.
When to use CGM
CGM is a good option for people with diabetes who want to improve their diabetes management. It is especially helpful for people who:
Have frequent highs and lows
Have difficulty controlling their blood sugar levels with traditional blood glucose testing
Are at risk for hypoglycemia or hyperglycemia
Are pregnant
What happens when you are dehydrated or playing sports?
When you are dehydrated, your blood sugar levels can rise. This is because your body is not able to get enough water to flush out excess glucose. When you are playing sports, your blood sugar levels can also rise. This is because your body is using more energy, which can lead to a release of stored glucose.
If you are using a CGM, it is important to monitor your blood sugar levels closely when you are dehydrated or playing sports. You may need to adjust your insulin dose or eat more carbohydrates to keep your blood sugar levels in a safe range.
Dexcom sensor settling time
The Dexcom sensor needs about 24 hours to settle after it is inserted. During this time, the sensor may be less accurate. It is important to monitor your blood sugar levels closely during this time and to use a backup method of blood sugar testing, such as a finger prick, if you are concerned about your blood sugar levels.
Sensor placement
The placement of the Dexcom sensor is important. The sensor should be placed on the abdomen or the back of the upper arm. It is important to avoid placing the sensor on areas of the skin that are:
Injured
Irritated
Tattooed
Scarred
Acceptable tolerance of CGMS and blood sugar testers
CGMS devices are not always accurate, and they can be affected by factors such as exercise, illness, and food. Dexcom accepts a tolerance of 20% from blood readings. This means that a CGM reading that is 20% higher or lower than a blood reading is still considered to be accurate.
Most finger prick testers can be different to laboratory results. This is because finger prick testers measure blood sugar levels in the blood, while laboratory results measure blood sugar levels in plasma. Plasma is a thicker fluid that contains more glucose than blood. This is why laboratory results are typically higher than finger prick results.
Conclusion
CGM is a valuable tool for people with diabetes. It can help you improve your diabetes management and reduce the risk of complications. If you are considering using a CGM, talk to your doctor about the best option for you.
Disclaimer: The information contained within this blog post are my thoughts and do not constitute medical advice. Please consult your medical team before making any changes to your diet or program.
This guide is based on past experience, information obtained from other diabetics and input from a multitude of websites.
I have broken this guide up into 3 sections;
Pre-exercise (preparation)
Exercise
Post-exercise
Step 1: Pre-exercise
PUMP: BASAL: If you are on a pump, this usually involves setting a temp basal around an hour prior to exercise, but a multitude of factors will govern the % basal rate and how early you will start it. It seems a general rule of thumb is 30-70% depending on the intensity and duration of the exercise, the longer you exercise the more sensitive to insulin you will become. The faster (think Fiasp) your insulin responds to change, the shorter the waiting period prior to starting exercise could be. Short acting Insulin has a DIA (duration of insulin action) that usually lasts several hours (3-7ish), and any insulin you may have on-board (circulating within your body) will become more potent as you exercise, thus increasing the risk of a severe hypo.
MDI: BASAL: For most exercise under 40 minutes I would keep my basal the same and ensure I exercised in the morning, reducing the risk of a hypo by being fasted and by exercising during a period in time where we are more resistant to insulin. Of course you can exercise at any time you choose, but you need to be aware that if you did not adjust your basal according to your length and vigour of activity you are more likely to experience a hypo.
Snack and snack timing: If you exercise in the morning I prefer to exercise fasted provided the activity is under 40 minutes in duration. If the activity is over 40 minutes then I will have a small snack (under 15g of carbs) just before I set out. The carbohydrate requirements for individuals will differ according to your body composition (ie. smaller people require less fuel to achieve the same results as larger people would, or the more muscle you have the more fuel you will need). If I am exercising more than two hours after I woke up, I will require a snack to sustain me for the duration of the activity. I have found that 20-30 minutes after my snack seems to be my ideal time (snacks with higher protein / fat will digest more slowly than high carb snacks) to begin exercise. Its very much a process of monitoring and evaluating until you find what works for you.
Hypo treatments: Glucose, dextrose or sucrose in liquid form is by far the quickest and most precise way to treat an impending hypo. Its important to note that liquid is absorbed much faster than solid foods according to the Manhattan gastroenterology website. Ingesting solids foods during activity can result in post-exercise hyperglycaemia as the foods begin to digest soon after exercise stops.
“Exercise and digestion can be mutually exclusive. When you exercise, your body isn’t using its energy for digestion. Instead, it slows any digestion currently taking place so it can divert as much blood as it can to feed your muscles and your lungs.”
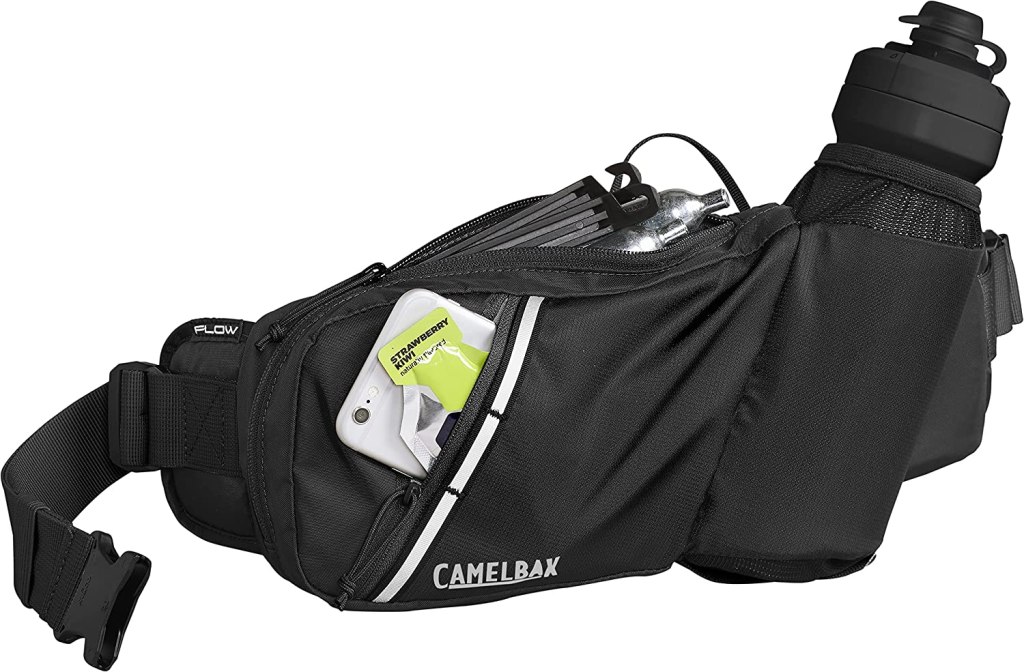
I use a Camelbak Podium bum bag to store my pump, glucose gels and Powerade.
Other items to consider:
Cannula placement; If the cannula is in the muscle group you plan to train, you may need to reduce basal further.
Sleep; If you are sleep deprived you may require more insulin.
Wake up period; If you are training within two hours of waking up, you may be more insulin resistant and require less pre-training fuel.
Pump suspension; If you suspended your pump you will need to consider the period of time that your pump is suspended as you will have missed that basal insulin.
Step 2: Exercise
In my opinion, the most important things to do whilst exercising is to monitor and respond as required. I take my blood sugar at 15 minute internals when doing cardio ( I have a CGM attached to me at all times, but I prefer to use blood as its more accurate), which as you become more comfortable and attuned to your body, you could probably push to between 30 and 60 minutes to match testing to glycogen store depletion.
The average non-diabetic athlete has between 350-500g of stored glycogen when fully stocked (think high carb diets, the body stores less on lower carb diets) and up and 50% less glycogen just after waking up. These glycogen stores get fully depleted at around 90 minutes or 45 minutes if you exercise in the mornings . A Medivizor study suggested that diabetics have up to 21% less glycogen stores than the average person. If we consider the aforementioned statement regarding diabetics reduced capacity to store glycogen we realise that early morning exercise could lead to glycogen stores being depleted in as little as 35 minutes for the athletic individual, earlier if you are on a low carb diet or are untrained as your body uses glycogen less efficiently.
The Portland clinic advises that;
“During the first 15 minutes of exercise most of the sugar for fuel comes from either the blood stream or the muscle glycogen which is converted back to sugar. After 15 minutes of exercise, however, the fuel starts to come more from the glycogen stored in the liver. After 30 minutes of exercise, the body begins to get more of its energy from the free fatty acids”.
My personal experience seems to correlate to these findings and that’s why I test at 15 minute intervals, especially when starting a new routine, or restarting an old one. Also consider that you need insulin to utilise glycogen.
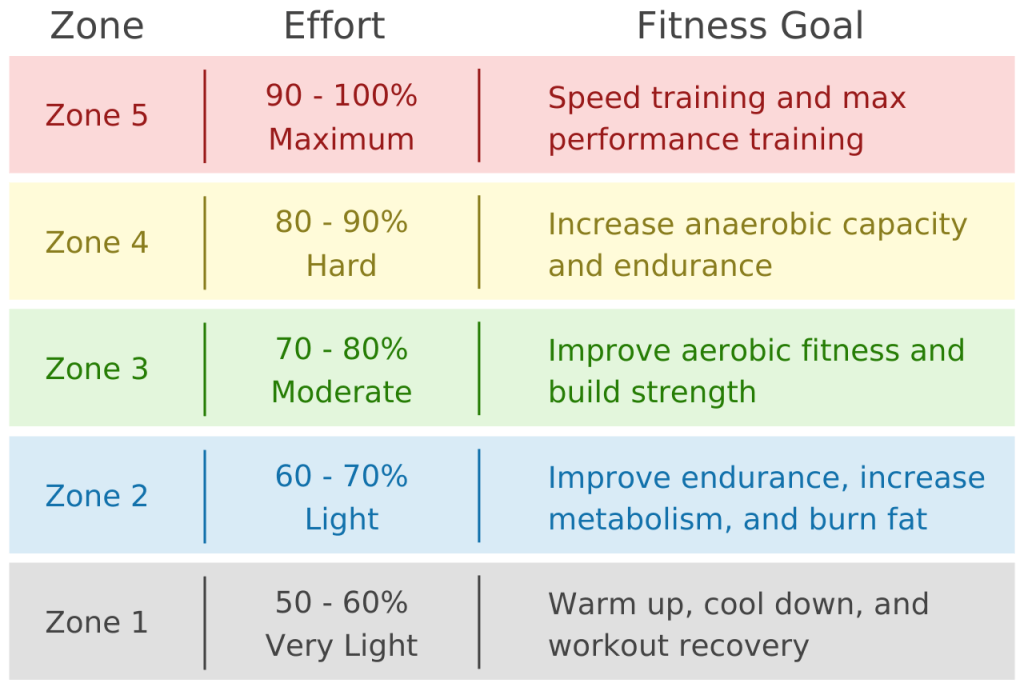
Effort levels can also influence blood glucose. Exercising at higher intensity levels can increase blood glucose due to stress hormones being released.
I use the formula 220-age to calculate my maximum heartrate. Then I can calculate effort from the below chart. I can then use this information to keep an eye on my heart rate during exercise and adjust my training effort as required. I also use this information to adjust my subsequent insulin doses as I am more sensitive to insulin an hour or two after exercise ( or directly post exercise when on MDI)
Starting Insulin recommendations in-line with activity durations
An example of how to use the table above would be if I had exercised at a moderate pace for 40 minutes, I could then experiment by decreasing my insulin dose by 67% and adjusting further if needed. Its easy to do this in Loop with temporary over-rides.
Temporary over-ride in Loop
An example of what I do to prepare for a run with Android Artificial Pancreas System (AAPS).
Step 3: Post Exercise
PUMP: I am not experiencing the sudden insulin sensitivity increase I did while on MDI. I believe this to be due to the fact that on MDI I cant reduce basal, but with the pump I can decrease basal as required. Be careful not to decrease your basal too much as your blood sugar will increase due to an inability to utilise glucose effectively. If you are using Loop then you could start a temporary over-ride to adjust insulin delivery for the remainder of the day. AAPS is capable of adjusting insulin requirements using a function called autosens which monitors deviations in insulin requirement. Below is a chart of insulin sensitivity post exercise grouped by exercise type.
MDI: I would generally be around 40% more sensitive to insulin immediately after a moderate run or cycle. This reason the onset of the sensitivity seems more rapid is due to the already circulating basal insulin now being super-charged. I found that exercising on MDI lacks some of the flexibility that pumps users have to adjust training duration or time period around your basal dose. On MDI I would the Spike app to adjust my meal time doses according according to the duration and intensity of the exercise. Spike is a very handy app for Apple MDI users to use as it can track meals, insulin and exercise. As well as have the functionality to calculate and adjust adjust insulin doses based on carbs and exercise input.
Screen capture of the the Spike-app.
NOTE: The Spike app is still available, it just requires a developer license and a significant time investment to install as its not available on test flight or the Apple store.